Wednesday, August 27, 2014

All Work And No Play....

We decided that we desperately needed a break from the non-stop boat refitting. We have literally not had more than a day or two break for 2 years and it was most assuredly time. If this means our departure date slips by a few weeks, so be it. We need some time away from projects and we needed to get Kitty to see her family in Scotland before we left. Maura has work (you go girl!), school work and rehearsals so she is staying behind with family while the 3 of us take off for a wee break.

The first person to comment that they 'really wish we would get back to the boat projects' has my permission to bite me. This was supposed to be a travel/sailing blog, not a boat refit blog but the Universe has a sense of humor. So for the next few days, we are going to pretend that we have been a travel blog all along. Don't worry, there are plenty of boat projects waiting for our return- TRUST ME.

And now, I give you a  day in London...

We just had a brief, one day stop in London. I know I am supposed to love this city and there is a lot I do like about it, but I just have never felt an affinity for it. The last time we were here we had the benefit of glorious weather. This time we were not so lucky and were drenched in rain the entire time. Not the soft, typical drizzle but seriously drenching down pours. This is why there are precious few photos out and about in London- it was too wet and I did not bring an underwater camera with me. My mistake.


Kitty was excited to fly on the plane. She is old enough and has enough knowledge to understand how truly amazing it is to be able to launch a piece of metal into the sky and to fly half way around the world. At 4 , flying equals magic. Who needs Disney?


It stopped raining long enough for me to grab this shot of the back of St. Pancras Church, just outside our hotel. I found these beautiful, but terrifying. Any Dr. Who fan who saw 'Blink" will understand why these creeped me out, being just outside the hotel...

No need to fill out enrollment forms, the kids are already enrolled...

Kitty thought riding on the double decker buses was pretty darned exciting. Here's a cheap travel tip. Skip the tour buses. Just buy a ticket for the Trafalgar Square bus (91) and you will get a drive by of a lot of the big sights. Sit on the second level and if you can get a seat up front, any small kids will be convinced you are on a roller coaster like adventure ride. You can take a short walk over to Parliament and Westminster passing by the Horse Guards Parade Grounds. Same kind of pomp as the Queen's Guard at Buckingham or St. James Palace but with horses so it's just better.


Trafalgar Square, from the top and front of the cheap bus which also has the benefit of being out of the rain.


Look kids! Big Ben! Parliament!

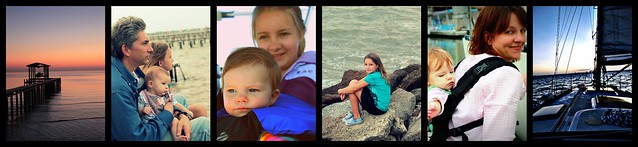
I have become acutely aware that there are just about no photos of me with the kids. I am attempting to rectify this so the kids do not wonder what happened to me years from now.


We ended our evening in London at the Horse and Stables Inn near the Thames and London Eye. Despite having a limited menu due to the bank holiday, we enjoyed a great dinner of an incredibly fresh steak and ale pie accompanied by a pint or two of Harviestoun Bitter and Twisted which was a new ale for me and was it ever delicious.

So that was our brief stop in London before we moved on to other locales....


Sunday, August 24, 2014

Behold! A Spud!

While I have been sanding (pretty much non-stop) Mark has been hard at work refurbishing our turtle shell. This is the fiberglass piece that bolts to the deck protecting the companionway. It not only needed to be repainted, with new non skid applied but since we have decided to mount our instruments over the companionway for easy viewing, of course the project grew in scope. Now it needed to be set up to keep all that wiring that makes the instruments go BING! tidy and away from water. So Mark began the turtle shell refurbishment in earnest.


Mark carefully built custom nav pod mounts out of fiberglass and epoxy. This went just about perfectly. Anytime a small project goes "just about perfectly" we hold our breaths. The refit gods giveth and they taketh away. it's all about balance apparently.


As he started to install the conduit for the wiring, it became apparent that a standard  PVC elbow would not work. The turning radius was too tight and the wires needed to be neatly contained in a tapering conduit. This is not something you can just buy off the shelf and be done. Oh no, that would be too easy. As I sat nearby sanding ( that seems to be all I do these days), Mark informed me he needed to run to the market for a potato.What? A potato. Well, yeah of course.


Once the required tuber was acquired, Mark got busy whittling. Kitty asked if he was cooking. Nope, just  doing some boat work, nothing to see here.


After carefully checking the turn radius and matching the diameter to the PVC conduit, it was time to tightly wind plastic wrap around the potato.  To me, this seemed like a lot of effort on a potato that would not result in fries but I fully admit my opinion might have been influenced by the fact that it was getting close to dinner time. And I was hungry.


Once he had everything to size and tightly wrapped, Mark got busy with strips of fiberglass cloth and epoxy. After a night of curing, we had a custom elbow which would allow the nav pod wiring to be gently coaxed into position, kept watertight and tidy. Success. Now all that was left to do was to core out the potato and prepare it for installation.


Sadly, there were still no fries.


So while I find the whole potato as a refit tool amusing, I have to admit that it worked pretty darn well. Kind of weird, but it works. I wonder if the chandleries will start carrying produce.

With the conduit sized, built and ready for installation, Mark was ready to begin the painting of the turtle shell. Having dealt with an Awlgrip painted hull, we were determined to find a better paint. Paint that does not require a very expensive specialty soap which does nothing to improve the boat because hey, at some point a previous owner had the boat compounded and waxed and you can not compound Awlgrip. So after much thinking and research we decided to go with Awlcraft 2000 which has the enormous benefit of being buffable but- like everything comes with a tradeoff. Namely that it MUST be sprayed. No relatively easy to DIY rolling and tipping. No Awlcraft must be sprayed and spraying is a skill requiring a bit of technical finesse.

Mark carefully followed the manufacturers recs for mixing ratios. He installed a total of 3 inline filters to prevent any moisture from causing runs and orange peel and other painting atrocities. Mark wet down the painting area to prevent any dust from marring the finish. he suited up and put on his respirator and slowly, carefully and methodically began to paint.

The primer coat was looking pretty good. Buoyed by his initial success, Mark continued on the next coat. It looked horrible. Fish eyes all over the paint which means despite his best efforts, our ridiculously hot and humid climate was sneaking water in past the filters and completely jacking up the paint.

As Mark was sanding away the evidence of his painting debacle, he piped up "what we need is a heat exchanger". I made the mistake of asking why and then he went on to what I am sure would have been an enlightening lecture on thermodynamics had I been armed with a notebook and pen. Something about gasses and vapor and temperature fluctuations and "what's the upshot?" I asked. The upshot was we would be building our own heat exchanger. So $70, a few trips to Kemah Hardware and a couple of hours later we were now in possession of a heat exchanger to cool the air which should help reduce the moisture coming through and jacking up our paint job.


 Once again, Mark suited up and primed the turtle shell. Once again, he waited patiently for it to set up before he painted once again, this time with his custom heat exchanger. After careful application of two coats, he stepped back to admire his work. There was about a 95% improvement in the amount of fish eyes. Unfortunately, Mark is OCD enough for this to be unacceptable. After living so many years with the ARE, I got it and decided that yes indeed, we were still not quite there. Yay for more sanding.


A bit dejected, we packed up to have dinner at a get together with other sailors. One of the sailors is an experienced body shop owner. As Mark was relating his painting woes, this wise in the ways of painting let us in on a secret, "Oh, you just need an airless paint gun. You can rent them". While we are so grateful to have this bit of information, we can't help but chuckle. Of course this was a problem with an easy solution. Of COURSE Captain Perfecto had over thought it and over engineered it. This is just how this entire refitting process has been. *sigh*

I am still trying to remember all of the thermodynamic theory. My brain hurts.

The Universe wants to be sure that Mark and I are a unit, experiencing the same tribulations and trials. This means that my first round of varnishing it absolutely HORRID looking and will require a redo which means, more sanding. Ugh. Fortunately, Kitty loves to make videos and I have convinced her she is hosting a DIY refit show which means I can get her to sand for me by telling her we need another take for "her show". I might be a varnishing failure but I am a work load sharing GENIUS. Tom Sawyer has nothing on me...


P.S. Mark thinks that he can achieve that final 5% improvement in the paint job by adding ice to the heat exchanger water to further cool it, there fore making any airless gun rental or purchase unnecessary,. Help me. Someone, help me...

Monday, August 11, 2014

My new found career as a stripper

No, not THAT kind of stripper. That kind of stripper would ostensibly have a lot more cash and not be covered in a mixture of sweat and teak dust. I have been spending far too much time stripping the little bit of teak we have around the companionway hatch and cockpit in preparation for a brand new coating of varnish.

See, Mark started the fabrication of a navpod to fit over the companion way. This will allow us to see our instruments easily, not block our view and not give us the claustrophobic feeling that a big navpod attached to the binnacle in a small cockpit would. Well since Mark was improving things around the cockpit, I thought I would continue the theme by doing something about our peeling, flaking and tired looking teak hatch trim and companionway doors.
Mark and Kitty work on the navpod mounts

The interior of Ceol Mor is kitted out in beautifully finished teak. The small bit of exterior teak was not quite so beautiful. Flaky bits of varnish lifting off the teak to display bits of weathered grey here and there to contrast with what once was beautifully finished teak. A decision had to be made. Either let it all go grey, live with a hodge podge mess of finished and non finished teak or get busy redoing it all.

We have friends who have left their teak to weather naturally. I can understand the appeal of taking the path of less resistance because redoing the brightwork is a pain in the butt. This is probably the smartest route to take but when have I ever claimed to be smart?

 Ceol Mor does not have a lot of exterior teak so just letting it go felt a bit lazy. I also have an ulterior motive. One of the totally-not-necessary-to-cruising items that is on my wish list is to have the hull painted and have our tired canvas replaced. It will be easier to make a case for going to the expense and bother of repainting the hull eventually if the teak is in beautiful, shiny condition to contrast against the aging hull paint. Always thinking ahead....

And so I have begun this project in earnest. Step one- strip off the old varnish.

Since this is my first go round of redoing the brightwork, Mark and I thought it would be a good idea to try to different methods of stripping the wood to see what worked best.


My first attempts were using Circa 1850 stripper . Now this is indeed, powerful stuff. It will strip off any old lacquer, stain or varnish. It will also eat through reputedly chemical resistant gloves and despite your best attempts to work in a meticulously tidy manner, there will be a tiny drop of stripper that will be launched by a brush stroke which will land on your skin, raise a blister and burn like a m@#h3r. This will happen more than once. If you are going to use this stuff, you MUST use heavy duty neoprene gloves. A hazmat suit would also be a good idea. Personally, I would try every other method first. This is nasty, nasty stuff. Also when they tell you it will only take one coat they are lying. Lying lying lying. There is a use for it , in small areas where you just can't get a heat gun and stripping knife in there but the toxicity of the stuff coupled with the huge, gooey mess it makes makes other methods much more appealing.


I found using a heat gun and knife MUCH much more enjoyable. Except for that one time Kitty came running up and I pulled the hot gun away to be sure I did not burn her. Instead I gave myself a brand right above my knee. That was less than ideal. Still, the heat gun is a much better method and aside from burns you don't have the worries of chemical burns or bits getting into the water killing every fish for a mile.

Mark asked me how I was getting on with the gun and was I managing to not scorch or burn the wood? See, here's the thing Mark... What you call "scorching" and "burns" I call patina. I did accidentally add a bit of patina to a thin, raised bit of teak trim on the companion way door panel but that should just buff right out. *ahem* Just a friendly reminder if you go this route to keep the gun moving on those small, tinder sized bits of wood unless you love um, patina. That's it, patina.

Once the old varnish it was time to sand.
And sand.
And sand some more. Day 4 or sanding and I am beginning to rethink my previous conclusion that Ceol Mor only has " a little bit of teak". I also begin to rethink my love of old wooden boats with gorgeous brightwork and start to think all the newer production boats with no teak whatsoever are starting to look more and more attractive.
Change to a finer grit paper and sand some more.
And sand.
And sand.
Whoopie! We are up to 320 grit paper and again with the sanding.

Once I had gotten everything sanded smooth, cleaned and degreased and stained, it was time to move on to the really scary part- varnishing. Why was I frightened? Because I am very aware that if the humidity does funky things or my application is not just so I have to go back and strip everything again and start over. Not a thought I wish to entertain. Like, ever.

After much debate we decided to go with Interlux Perfection PlusThis is after everyone near and far suggested their personal favorites. In the end, we decided to trust Practical Sailors recommendation for longevity based on their testing. We will see how it goes.

I've gotten the first coat on the companionway hatch trim. Coats 2 and 3 will be applied today, then 4 and 5 tomorrow followed by 6 and 7. Then it's on to the doors, then finish up the stripping of the hatch on the boat. I doubt it will all be done until after we return from an upcoming trip (to escape the heat) but fingers crossed it will all be done by mid Sept at which time I will post photos.

Until then, I am off to sand some more.


Friday, August 1, 2014

What about that boat baby?

We are putting in some serious time in our big push to get many items ticked off our list  and to get the boat ready to sail before late August. Why late August? That is when the temperatures become absolutely unbearable. There is about a 2-3 week window just before September when the temperatures go nuts just before they return to a sane 90 Fahrenheit or so. We work in the early morning until about lunch time, when we knock off until after 3 when things cool down a bit and then we are back at it until dinner sometimes around 7:30 or so.

My friend Cindy asked me what Kitty was up to while we are putting in the sweat equity. Well, since you asked...

Kitty goes with us everywhere. She has several jobs she takes very seriously. The first is to be the resident Dock Star. Nobody walks by without a hello from her and a lightening fast barrage of questions ranging from "are you working on a project?" to "what is your boat name?" to "do you like cotton candy?" to "who is your favorite My Little Pony" and everything in between.

Kitty manages to squeeze in a work out every day. This is because there is rigging on the boom which is just the perfect height to work on chin ups and inversions.

When we head back to the workshop to work on projects, Kitty is right beside us ready to work on her own. She is a little annoyed that she has to share our tools as she wants her own "sparkle pink" tools and could she PLEASE get her own drill, a real one.


Our evenings are spent taking her for a swim, or a walk or just watching her perform her latest song and dance routine. She seems to take it all in stride. Mainly because she is absolutely part of the action. Every time her dad declares a project complete she asks the same question "are we going sailing now?" Soon sweet Kitty. Very, very soon.