Sunday, October 26, 2014

Hatching A Plan....

Tackling the deck sounds so straight forward. Just slap on on new deck hardware, a a little butyl tape and get on with it. But this is our home we are talking about and she hasn't been through a really thorough revitalization and at 30 years old, it's way past time. Also, Mark is not called Captain Perfecto without good cause. Due to these factors, we figured if we are going to take the time to refit and refurbish the top sides, might as well get it ALL in tip top shape while we have the boat apart.

While we have the hatches off to paint the decks, we thought it best to get our hatches in the best shape we possibly can before rebedding and reinstalling them. I documented how we managed to save the lenses previously with polishing, now it's time to get the frames themselves in the best shape possible.
Hatch frame before anodizing and refinish. I think you can see why we had to do something....

We sent the frames out to have them bead blasted and anodized with a hard finish. We got them back recently and well, while they were improved we still had concerns. The finish achieved was a bit rough and pitted. To us it was more than a cosmetic issue. We are were concerned that those tiny little pits and crevices would provide an entry for salt water to make it's way into the structure and just chew through the aluminum. We really do not want to have to replace these at over $1,000 a piece so we got to thinking...

After thinking it through for a bit, Mark got busy.

First off,  he carefully sprayed the frames with a coating ofWest System epoxy. We seriously love West Systems. So so many uses. Usually West Systems won't adhere to aluminum but we had enough pitting to provide "grip" for the epoxy. We let it cure to a hard finish before sanding it with 220 grit sand paper. Add another thin coat of West Systems, cure, sand and repeat for a total of 4 coats.

  Now we were faced with yet another challenge. West Systems is wonderful stuff, but it is not UV resistant. Paint however IS UV resistant. The question now was what pain

We knew we wanted to keep the frames silver. We just assumed we would pick up some Awlcraft 2000 in silver. Not so fast peeps. Silver in either Awlgrip or Awlcraft is special order so there is the time element. Then there was another big tick against it in this application. It is also $175.00 a quart.
Ouch,

After having a good, long think about it and reading all the info we could on various paints we decided to bite the bullet and go with Paint Shop Duplicolor in silver. $25 is a lot easier to swallow than $175. Our worry is whether or not it will adhere well over time to the epoxy. We are going to watch and will give a report in a few months time. If you are thinking of going this route, wait a bit and see how our paint holds up. If it all goes horribly wrong, you can skip it and just thank us for doing you a favor. That's us, doing the stupid so you don't have to,

While the final coat of West System was still tacky, Mark applied a primer coat of paint. After letting it dry completely, he applied 3 additional coats of paint. We have found through trial and error that many thin coats gives a much superior finish to fewer, heavier coats.

After the final coat of paint has had a good cure,  a bit of wet sanding with 400 grit paper and we are ready to add our final clear coats. We once again busted out the Interlux Perfection Plus and applied 2 coats. One of the ON label uses of Interlux is as a clear coat for painted finishes and it offers really great UV protection so fingers crossed it all goes as we think it will.

And Voila!
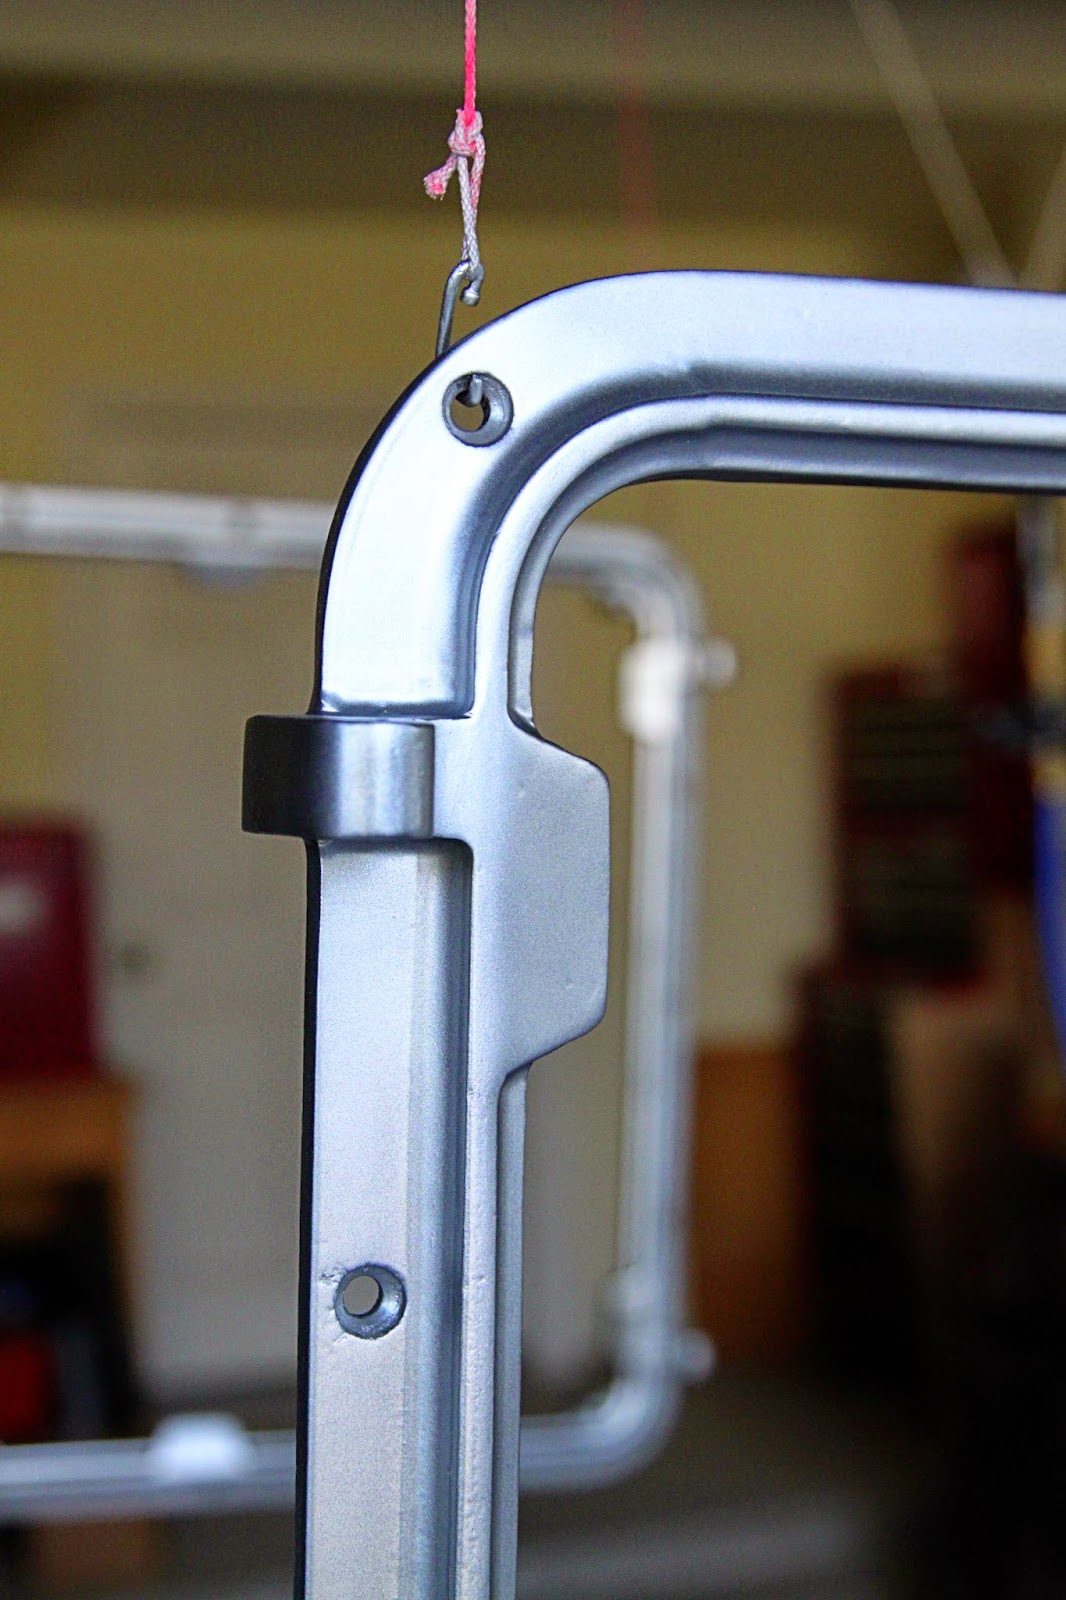
Newly anodized, sprayed with epoxy, sanded and painted, Just awaiting one final clear coat then fingers crossed!


Saturday, October 25, 2014

A Cure for The Varnish Blues

I've been thinking about changing the layout and design of the blog for a bit. I'm still thinking big blog design thoughts but I think I do really need to change the tag line. 'A little crew, a small boat and a great big world to see' will work perfectly when we cast off the lines (looking like late spring at this point) but until then, we are still- despite our heartfelt desires for it to be otherwise, a refit blog. In keeping with the way things have been going as of late, I have come up with a new tag line:

Our Life With Ceol Mor- we do the stupid so you don't have to.

The finish we achieved thus far on the varnish left much to be desired. Dragging, brush marks, runs, etc, etc. We could just call it good and live with the uneven, kind of gloopy (gloopy IS a technical term, At least now it is.) overly thick finish. A previous owner had made this choice at some point in the past which is why we were dealing with some fairly manky looking flaky, peeling varnish in the first place. Our thoughts were if we get the bright work to a really fine, immaculate finish then it would be easier to keep it up to a level we are happy with. Since neither one of us wants to ever have to take it down to bare wood again, we've spent the time to get it right.


Varnishing is one of those jobs that sounds fairly straight forward. If you follow the instructions in the refit Bible This Old Boat, Second Edition: Completely Revised and Expanded you thin the initial coat of varnish by 50%, then 20%, then 10% and continue on with sanding with specific varying sandpaper grits and you should have a beautiful finish after about 9 coats. Mr, Casey gives excellent advice but with one caveat. He should state that this works "Sometimes, Usually, Mostly. Unless you have crap brush skills".  We do in fact, have crap brush skills. Also,  Ceol Mor apparently likes being unique and quirky which means that despite our most careful adherence to the manufacturer's and Mr. Casey's instructions, our finished product looked well, crap.

Mark had a think about it and I am thrilled that after much sanding (MUCH sanding) and trial and error we have come up with a much more straight forward way of getting the level of finish we wanted. After applying an initial coat 2 coats of  Interlux Perfection Plus Varnish Clear Quart Kit thinned 75% with Interlux Reducing Solvent 2333N to really get it into the wood, we thinned EVERY coat 50% and applied it with a soft cloth, much like a French polish application.


YES! Success! Okay, so it's not a time saver as we applied 20 coats this far., (Yes. I really did say 20 coats. There are 10 more to go so a total of 30. Jinkies.) but the level of finish is one we are happy with and the results are very consistent. We are hoping that with regular maintenance every 6 months or so we can keep it looking tidy and pristine. A little sanding, a couple of new coats and fingers crossed it continues to look like shiny, happy bright work.. We could have saved SO much time and effort if Mark had just had the good sense to come up with this fix in the first place.


See? We do manage to muck it all up but come up with a fix that works. So if you are suffering the varnish blues, you might give this method a try. We just saved you a couple of weeks of frustration. We do the stupid so you don't have to,
Mark opted to mount the handrails on pvc pipe and then add counter balances to each end. 2 sawhorses, 'stops' mounted on each side to prevent the rails from rolling off and now we are able to rotate the rails to ensure a very even application. Best to do this now while the headliner is off.


Saturday, October 11, 2014

How To Polish Deck Hatch Lenses (or how to save a couple of thousand dollars)

Our Bomar deck hatches had seen better days. Despite using hatch covers, 30 years of sun and salt water had done their damage. One of the danged nabbit seagulls managed to hit an uncovered hatch lens with its caustic poop and even though it was on the lens for a brief time before being washed off, it did a number on the Lexan lens. Makes you wonder what they eat. The aluminum frames were in an okay condition but were starting to show signs of degradation.

Since Mark's goal is to not only improve the functionality of Ceol Mor but to also have her looking "like a million dollar yacht" we had a choice to make. Replace the hatches- at over $1,000 a pop. We have 3 large hatches and two smaller ones. Over $4,000 to replace. Next please. Replace the lenses at a couple of hundred bucks a piece for our large hatches. Refurbish them ourselves and hope they seal as well as the original lenses. We are on the downhill side of a massive refit. I no longer am willing to "hope" for anything. Since we want to only have her LOOKING like a million dollar yacht and lack the funds to actually MAKE her a million dollar yacht, we thought the best plan of action was to try to refurbish them ourselves since they were structurally sound, just ugly.

Before. Yuck.
After removing the deck hatches, we sent the frames off to be re-anodized. The quote was $175.00 in total for 4 hatch frames (the bottom frames only). While they are off being bead blasted and re-anodized, it was time to see if we could save the lenses. We could and we did. Here's how we did it.

Equipment needed- Wet Sandpaper in 320, 600 and 1000 grit
                                 A water source.
                                 Makita Variable Speed Electronic Sander
                               PRESTA Ultra Cutting Creme                              
                                Presta- Chroma Ultra Polish
                                 A cutting/buffing pad
                                 A polishing pad

The first step was to wet sand with the 320 grit wet sand paper to remove crazing and scratches. Don't get too aggressive and take your time making sure you have a constant flow of water. You want to remove the scratches, not add new ones.

Once you are happy, repeat the process of wet sanding with the 600. Then again with the 1000 grit. Just take your time and keep the surface wetted. Mark had a hose, with a sprinkler nozzle, to rinse down the work-piece and remove sanding residue throughout the wet sanding.

Once you have wet sanded thoroughly, it's time for power tools. We really like the Makita as it is pretty much a work horse and has been pressed into service regularly and it just keeps keeping on.

We applied the cutting creme directly to the lens, working in small areas. Some folks swear by applying it to the pad itself- many ways to skin a cat I suppose. Having priced out replacement lenses, we thought it best to go slowly and carefully working on a small area at a time. Regardless, this is one time when the brand of products matters. The Presta products really are all that, so if you are going to take the time to do this, take the extra time to source the Presta products. Remember to let the polisher do the work for you and don't apply too much pressure. Slow and steady matters here.

Once you have thoroughly worked the cutting creme, gently clean the lens with water and a non abrasive cloth. Now comes the fun part. Change your pad to a clean polishing pad and once again, working carefully in small sections, begin to polish using the Chroma Ultra Polish. Mark went over each lens a few times to get the level of polish he was happy with. And that's it.

This was probably one of the most satisfying projects. The outlay in materials was not great and while it did take a bit of time, it actually was very straight forward and easy and what a pay off. The difference in the lenses is remarkable. I can't wait to get the frames back and have them reassembled and mounted on the deck. I am going to be able to see clouds with CLARITY! Yippee!
                             
After- HUGE improvement and this is before we cleaned the inside of the lens. Once we cleaned it, wow.
    

Friday, October 10, 2014

Hit The Deck

We arrived home from the airport and were back at the boat within an hour. We had a bit of a breather but now it was time to address the last big topic on the refit- the deck layout.

Ceol Mor is a really great sailing boat. Bob Perry knows a thing or two about designing a boat which is balanced, comfortable and sure footed. Previous owners of Ceol Mor ostensibly purchased her because of the way she moves under sail. So why exactly did they undersize the winches then add a Bimini top whose frame fouls the winch handles constantly and, run lines so they aren't in the most direct line, have a track that does not allow the genoa cars to be adjusted without a set of power tools and a hammer and have a traveler that is pretty much inoperable? The only thing I can figure is they like a challenge. I like challenges too but fighting my boat just to adjust the sails is not one of them. Also, deck hardware options have a come along way since the 1980s and just the progress of line clutches alone warrants some redesign work on an old boat, Fortunately, Captain Perfecto feels the same and as a bonus he has mad engineer skills so after a long design process, it was time to get busy.

Painted and prepped and ready to go

With Mark's spudly wiring conduit and mounts installed to support the new NavPod, the turtle shell painted and polished, it was time to address the traveler. We removed the track and end blocks and had them re-anodized. Once we got them back, Mark began putting together his new design for the traveler car.
Stainless steel mounting plates made by Mark with, you guessed it- his beloved angle grinder.


 Being Captain Perfecto, he of course had to make his own part (which we will call a thingamabob) out of a stainless steel bolt. With an angle grinder. By hand. I am both proud of his design and craftsmanship abilities and terrified at his enjoyment of a successful outcome. No Mark, I do not want stainless steel davits hand crafted by you. I want to go sailing already. They would undoubtedly be beautiful and perfect and would take months to construct so...no.

From this, to this. No one can ever accuse Mark of not being patient.
In preparation for the installation for the deck hardware, we prepped the cabin top deck area for painting. No sense in mounting the hardware on a beat up deck that will have to be removed again soon for painting anyway, just get on with it bit by bit from the get go.

 We removed the hatches to have the frames bead blasted and re-anodized and started taping. It sounds like such an easy thing, taping. In actuality it took hours and hours to get it all done just so. The actual painting it self, using Awlcraft 2000 went fairly quickly. Thanks to the ability of Awlcraft to be sanded and buffed, we were able to get a finish we were happy with. Getting the spray gun to give a finish took a bit of time and patience but again, one of Mark's strong qualities is patience. We are giving it a bit of time to get a good cure on it before we get finicky with the paint line edges in preparation for painting the lower portion of the decks once we are ready to address the genoa tracks.


We had such a (ahem) good time spending countless hours taping, that we got to retape the deck in reverse to freshen up the non-skid areas. We used Awlgrip as that was there originally. We maybe aren't 100% happy with the amount of texture we got with the Awlgrip and Griptex. I think we made an error in going with the fine but we can make do for now. Just have to remember to wear proper shoes with grip until we can readdress this down the road. I think we are going to do a bit more research on Kiwigrip as we have friends who have used it with great success. The best is the enemy of good enough so we are moving on...

With the hatches out for refurbishment, it was time to address the hatch lenses. They were cloudy from UV damage, scratched from years of use and stained a bit from determined birds. It took a bit longer to get the lenses polished up, but polished up they are now. They look like new. Can't wait to get the newly anodized frames back, reassemble and rebed them. The difference in clarity and light through the lenses after attention is massive. Unfortunately, now the Sunbrella hatch covers are looking really sad so it's time for me to sew up some new ones.


We've gotten Kitty into a morning preschool twice a week and she is really liking it. When she isn't at preschool, she spends a lot of time on the boat with us. She spends a lot of time drawing pirate treasure maps. She gives them out to dock friends here and there, admonishing them to keep it secret. She's been through enough of a refit to wisely tell the potential treasure hunters that she will help them find the treasure by sailing with them on THEIR boat. Hang in there little one. We will be able to sail to find treasure with Ceol Mor very, very soon.


I can't see us having the boat back together in a month, but we are making steady progress and there is light at the end of a seriously long tunnel. I can see us having Ceol Mor back together, in tip top shape and ready to sail very soon indeed.


Wednesday, October 1, 2014

Oban Marinas....


Let's get the not so great bits out of the way. If you are thinking of leaving your boat in Oban and traveling inland Scotland, stop it. Stop it right now. The biggest downside to Oban is that it's kind of off the beaten track if you want to see something other than the Western Isles. Trains seem to go every place in Scotland finally stopping at the location you desire after changing trains every 2 hours and heading North, then South, then North again just to go East. Also, the local marinas are all kind of a trek from the city center and you had better have access to a car and be very up on the ferry schedule.

Oban is a tourist destination but strangely, despite us being there on a bank holiday and the streets being flooded with tourists, the town rolls up the streets at 9 pm sharp. We finally managed to find a pub on a back street but in Oban itself, seems like the holiday makers were content to hang out in their hotel bars.


The whole town has a bit of a "Torquay" feel to it, just instead of being on the English Riviera it's the Scottish Riviera. I felt like I was in some weird time warp. This was probably not helped by the fact that we stayed in a guest house which will forever be in my memory as providing one of the Top 10 most uncomfortable beds I have ever slept in. Despite feeling like a throw back to an old sitcom, I really liked Oban. A lot. It's just charming, despite the tourists and bit of weirdness.


Okay, those are the negatives. All of this being said, you should sail to Oban. You should plan on staying in the area for quite some time. The islands in the area are absolutely breathtaking. Seriously.

We checked out Dunstaffnage marina Tel- 01631 566555 . The downside is that the marina is 3 miles from Oban itself. The good news is their docks are in great shape, they have a 40 ton lift and a small chandlery onsite. The woman running the chandlery assures me if they don;t have it , they can get it ordered for you. They also have plenty of service contacts if you need service- be it electrical, diesel, rigging or what ever else you need Plus, you are within close proximity to some of the most beautiful sailing in Scotland. Seriously.

The other big option in the area is Oban Marina  Tel - 01631 565333 VHF Ch 80. The big plus here is that their complimentary ferry service drops you off right in Oban. The down side, you need a ferry to get to Oban. We didn't get a chance to really inspect the marina (we had Mark's mom with us, she is not as interested in marinas as we are!) but it looks like a promising option although you are more likely to get a mooring as opposed to a berth,


I don't think this would work as a permanent base for us as it's a bit difficult to access by land but you had better believe we will spend a good bit of time sailing in the area. It's just that pretty.